With the global success of Minecraft, Notch and the gang at Mojang have captured the imagination of gamers everywhere. People have gravitated to dimensional 8-bit world by the millions, and the positive, creative outlet has become a neutral playground for all ages.
Many institutions have taken notice to Minecraft's influence, and welcome it with open arms as a tool for educating, communicating, and inspiring. It was no surprise that the Victoria and Albert Museum in London reached out to Lydia Winters, Mojang's Director of Fun, to see if they could host a Minecraft themed exhibit for their Friday Late program.
Lydia dreamed up an art show where Minecraft artifacts integrated into all of the existing exhibits throughout the museum. Using Minecraft as a familiar point of entry, young minds would find themselves exposed to centuries of amazing art they may have never chosen to explore on their own.
Of course, this meant having to create all of those artifacts. Thankfully, I was the first person she thought of to be involved in such a project. However, knowing that I was busy with a few other things (mainly: Minecon 2013, a couple network television shows, a few independent movies, Floppets, etc.) Lydia opened the conversation by sending me a list of the rooms she wished to have objects for, and offered me first pick of the exhibit I wanted. I, in turn, presented a list of ideas for ALL of the rooms, because, honestly, I would have been excited to make something for any of them! It turns out that Lydia liked all of the ideas, and it was decided that I would be the artist representing Mojang in all of the physical mediums for the "World of Minecraft" exhibit. Ultimately, I created 21 original pieces to be displayed at the V&A.

Photo 1: The Victoria and Albert Museum is the world's greatest museum of art and design. It was founded in 1852, and houses over 4.5 million precious objects. Works from many of the great masters can be viewed here, from early Egypt, ancient Asia, to the Medieval and Renaissance periods, through modern times. As you can imagine, it was a huge honor for me to be able to display my work within these hallowed walls.

Photo 2: I started the project with the most complicated piece, a faux marble statue of Steve and a wolf. I guess it's really a dog, since it has a collar, but "wolf" sounds so much more poetic! Junkboy provided me with 3D models, skins, texture packs, turnarounds, everything I could need to create physical Minecraft characters, but Red5 and I have found that the fastest way to mock-up a Minecraft project is to find a fan made papercraft project online! They are highly accurate, and easy to assemble, so within minutes I can make a concept model for that character I wish to build.

Photo 3: Once I had my design locked in, I used the mock-up to figure out a scale to build the final piece in. By choosing 3/4" pixels, the finished Steve would stand 24" tall. I created a styrene gridded panel the size of the largest area of Steve, which is his torso, at 8x12 pixels. This was then molded, and dozens of panels where cast out of urethane.

Photo 4: Each panel was then marked off by the number of pixels that each sized it to each area of Steve. Then I marked what corners needed to be bevelled in order to have square panels.

Photo 5: I used a dremel with a course grinding wheel, and with some help from the team, ground all the marked corners to 45 degrees. This process results in a lot of fine urethane dust, which clung to the hair on my arms and created an awesome "frozen" effect!

Photo 6: When the panels were bevelled, I began to assemble the "boxes" that make up Steve's parts. I used a small modeler's square to make sure that all of the planes connected at a 90 degree angle.

Photo 7: Because I wanted the final piece to have a monochromatic marble look, I wanted to separate Steve's various colors and features by putting them on different planes. As the game assets all follow a strict pixel dimension, I decided it would be easier to "stretch" the corner pixels of any bumped out area, rather than create a different scaled grid. I achieved this by using styrene tubes as spacers, and then filled the gaps in with Bondo auto body filler.

Photo 8: This technique was most visible on Steve's face, where I inset his eyes and bumped out his nose and hairline. Emulating a stone sculpting process from the past, I set the pupil back further than the white of the eye, so the natural shadow would make the space appear darker. Never having to dimensionalize Steve, this was the first time I came across the controversy concerning the pixels of the lower face. If the pink pixels under his nose represent a lip, do the brownish ones along his chin form a beard, or a smile? Apparently, no one knows for sure, and Junkboy thought it was funny that I didn't know, so I made my best guess, and decided that a beard was best suited for this "ancient" version of Steve.

Photo 9: As much work as it was, assembling the boxes for Steve was the easy part! I found it much more tedious to make all the proper cuts to pose him properly. I started by going back to the paper craft version, and experimenting to get the right angles before committing to cutting the actual resin pieces.
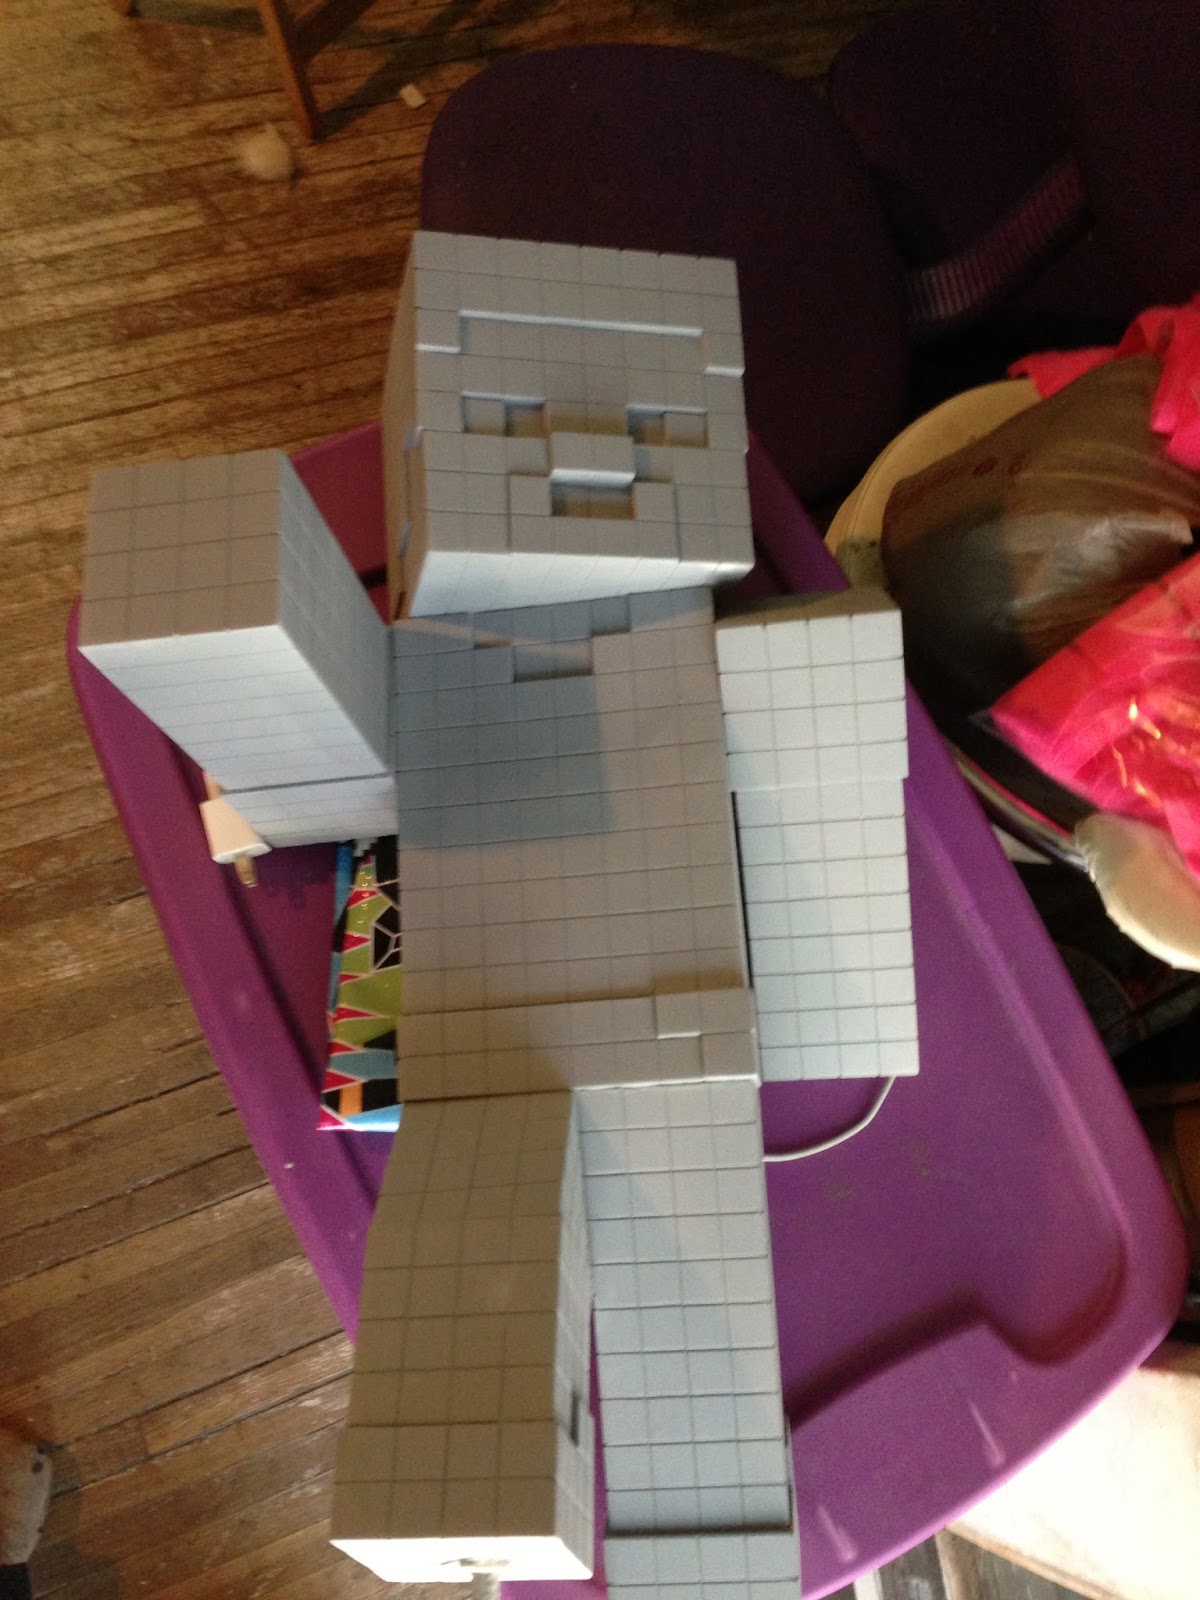
Photo 10: Steve was secured together by gluing the angled pieces together, then dropping 1/2" armature wire through the hollow boxes to create a skeleton. He was then filled with a two part rigid polyfoam, so he ultimately became one solid piece. Now all Steve needed was a sword...

Photo 11: The best part about making the miniature sword for this statue is that it ended up being the perfect size for my Boston Terrier, Print. He's no wolf, but he is much more likely to protect me from Creepers now that he is armed. The version he is holding is the foamcore mock-up I used to make sure I had the right scale before creating the final piece.

Photo 12: I built up the wolf with the same process I used for Steve, and then created a base. The idea was to make a Minecraft inspired version of a classical marble base. I used MDF wood, since it is very smooth, and pretty dense. The weight would help balance the statue and keep the figures grounded.

Photo 13: The final step was painting. The entire piece was sprayed with white lacquer, and then I "marbleized" it. I used a technique I learned many years ago when I did scenic painting for movie sets. It's quick and easy once you get the hang of it. I start with acrylic gel gloss medium, add touches of paynes gray and white, and use a large brush to create streaks that I blend in randomly. By doing this multiple times in layers, it forms a convincing marble effect.

Photo 14: Here is the sculpted clay cover for "The Book of the Nether", or the "Nethernomicon." This was the piece I designed for the museum's library. The category was "medieval books", and I had some ideas for lavishly bound, gold guilded tomes, but I asked Lydia if I could have more fun with it instead. She gave me free reign, so I created this ancient volume of Nether secrets, written in a long forgotten hand, and bound in Creeper hide and wolf fur.
Lydia had mentioned the possibility of a Minecraft art show earlier in the year, but by the time dates were chosen and the red tape was worked out, I had less than a month to create all the pieces. Mojang would have been fine with fewer displays, but they are huge supporters of my work, and I knew Lydia envisioned the experience encompassing the entire museum, so I did my best to make an installation for as many of the exhibit halls as possible. This meant working on multiple pieces simultaneously. I am trying to lay out progress for you here in linear fashion, but in reality, when glue was drying on the statue, I was sculpting on the book. And while this piece was in the mold, I was working on the paintings, etc.

Photo 15: After the sculpture was molded in silicone, three copies were cast. The first one became the front cover. The second one became the back cover, but I cut out the Creeper's eye and mouth pixels, and replaced them with the surrounding full pixels of the third copy. This help me avoid having to sculpt and mold a back cover. The finished castings were primed, and base coated in a dark olive. I then went in with various shades of green and dry brushed the individual scales. I went darker and grayer than the usual Creeper colors, as I wanted the hide to appear dead and tanned. To further this effect, I did a wash of burnt umber, so the deep areas would shadow, and the greens would mute out a bit.

Photo 16: If you are a fan of 80's horror films, you will easily recognize the influence of the Necronomicon from Sam Rami's original Evil Dead

Photo 17: Everyone knows that ancient books contain hundreds of pages, especially when they are chronicling unspoken tales of the Nether. I didn't have the time, nor the content, to create a huge volume of pages, so I created a large section of false pages. This consisted of several sheets of plywood stacked and glued together, then cut to a dimension smaller than the cover on three sides, but extending out to the spine on one side. I cut a hole in the center to make the overall piece lighter. The styrene dividers in the middle are supports, so the thin styrene sheet I used to cover the hole couldn't collapse in. I used an xacto knife to notch out a strip of styrene like a rake, and dragged it along a fresh coat of Bondo to create the illusion of pages.
Before the top cover was mounted on, I inserted the half dozen paper pages and fastened them down with a brass strip and a series of nails. Red5 printed out a series of charcoal drawings I did onto a parchment paper, and I burned all the edges. The bottom-most page was glued down to the wood block, so you could never turn past it. I'm sure that's where all the secrets are hidden!

Photo 18: The final step was to bind the spine with the fur of a wolf!

Photo 19: For the metalwork room, I dusted off the pickaxe from the Barnyard archives. I wanted all the pieces for "World of Minecraft" to be original, but there is no avoiding how much Minecraft fans love Steve's pickaxe! I figured not everyone has gotten a chance to see it in person, so I added it to the collection.

Photo 20: Armor and swords are a popular theme in the metalwork room of the V&A, so it made sense to pair up the pickaxe with an iron sword. I thought it would be fun to make it slightly more majestic, so this version is covered in silver and gold leaf.

Photo 21: For the Japanese exhibit hall, I got to design a weapon not in the game: a katana! It turned out to be very easy to pixelate this traditional japanese weapon. I went with the same angled pixels as the standard sword, but stacked them in three descending layers. The third, thickest layer became the spine, and the first, thinnest layer became the cutting edge. In addition, I painted each layer a different shade of metal to emulate the folded Tamahagane steel.

Photo 22: The guard was made of layered styrene. If you read my blog often, you know that I prefer sintra over styrene, for its ease of cutting and speed in gluing. But it's not nearly as sturdy as styrene, and I wanted these pieces to withstand shipping and handling to and from the museum.

Photo 23: The katana display also included a sheath. This WAS made of sintra, stacked to echo the shape of the sword so the blade could slip inside. The outside was then covered in Bondo to build up a smooth, slight arc. This was then paneled in a thin wood veneer. The fully assembled piece was stained with acrylics, and coated multiple times in clear lacquer. Red5 built a traditional katana stand, pixelized of course, to house both blade and sheath separately.

Photo 24: Red5 also handles a lot of the Google Sketch-up work around the BarnYard. But when I asked her if she could mod out our Enderdragon model to twist up like a Netsuke, a small Japanese sculpture, she really didn't want to! Sketch-up is an amazing program, but getting it to do curves and multi-axis spirals is like pulling teeth. So I went the low tech, old fashioned way and made a quick clay maquette. I started with 1' and 1/2" blocks cut from plasticine.

Photo 25: I used a small dragon I got in China as a starting point. I know that Chinese dragons and Japanese dragons are two completely different things, but the particular style and pose I was going for is common in both cultures.

Photo 26: Following the maquette made of easily malleable clay, 1" and 1/2" acrylic cubes were cut and beveled to mimic the curves. This proved harder than I thought, but with some struggling and a bandsaw, the end result finally matched the initial plan.

Photo 27: Knowing the massive size of the V&A, I had this fear that any display I made that was smaller than my hand would be swallowed up by all of the surrounding grandeur. To round off the Japanese collection, I added a couple more netsuke for more presence in the room. Here are the completed Ivory Steve (affectionately nicknamed Samurai Steve at the BarnYard) and Jade Creeper, influenced by !8th century Japanese design.

Photo 28: Next project to throw in the mix was the Stained Glass Window. The V&A has an amazing collection of some of the finest stained glass in history, with pieces from churches and nobel houses dating back as far as the 12th century! I think of all the piece I created for this exhibit, the stained glass was the most exciting, because it really was outside the box for Minecraft.
I started the piece with a rough Sharpie on paper drawing of a Minecraft countryside with a farmhouse, a pond, and sheep grazing under an open sky. I added a Mooshroom for color, plus they are my favorite animal in the game. I handed the drawing over to Amish, who created a 3D model of the scene and rendered a full scale version of the drawing, where all of the lines where perfectly horizontal and vertical, and all of the perspective was true.

Photo 29: This art was printed out full size, 24"x48", and spray mounted onto the back of a sheet of 1/8" plexiglass. I then used small strips of stock styrene to "trace" all of the computer generated lines onto the plexi, sealing off all the corners to create segments for the colored glass. I tinted polyester resin to various shades, and poured each segment one at a time.

Photo 30: The entire process was filmed, so you will be able to watch how to make faux stained glass soon on both my channel and the Minecraft channel on Youtube! Of course, my Frenchie, Art, was directing, so it may not all be in focus!

Photo 31: The finished piece! I achieved different glass like textures in the resin by layering it, over or under catalyzing it, or manipulating it while it was gelling. The end result is pretty realistic.

Photo 32: I got a break from all the tedious styrene modeling when I started the painting portion of the exhibit. There were two main areas we where targeting in the museum for this medium: The painting room, of course, and the famed miniature portraits.
I noticed that the miniature portraits seemed to all be displayed in small clusters of varying sized paintings, so I matched that motif with a collection of seven pieces, ranging from 1' to 6".The largest piece was of the main mind behind Minecraft, Notch.

Photo 33: The rest of the collection included Steve, the wolf, a chicken, a pig, a witch, and an Enderman.

Photo 34: The chicken was not happy about the lunch choice that day!

Photo 35: Print, on the other hand, was ecstatic!

Photo 36: Next on the agenda were the large paintings for the painting room. Although this room in the museum houses mostly medieval, renaissance, and Victorian paintings, I wanted to widen the scope of Minecraft and infuse the characters into a broad collection of classic images. I started by replacing the famous figure in Munch's "Scream" with an Enderman.

Photo 37: With all the work done...well, mostly done, the next challenge was packing it all up and getting it to England! While I put the finishing touches on stuff, Red5, Keri, and the gang had bubble wrap and styrofoam peanuts flying in a flurry of cardboard and tape. We ended up getting all 22 pieces of art into 4 boxes and 2 suitcases. Special thanks to Virgin Atlantic, who were very generous in letting me check in all those extra bags at a very reasonable fare!

Photo 38: Getting that pile of packages through Heathrow Airport by myself seemed like the most impossible task in the world, until I got to the hotel and Lydia and I had to get all those giant boxes down super tight, twisty corridors that slowly got narrower the closer we got to our rooms!

Photo 39: My room instantly transformed into an art studio, naturally. With only a few hours to go until the opening of the exhibit, I fought to make the time to finish off the final pieces. The look on Lydia's face when I pulled the blank vase out of the box was priceless. Luckily she didn't notice that the Netsuke Creeper sitting on the desk was still unpainted...

Photo 40: Finally, everything was finished! I got all the pieces to the museum, and the curators divided them up and started arranging them in the various rooms. The museum seemed to be miles long, keeping up with all the pieces was hard. Along the way, I saw Multiplay setting up for the lectures and party outside. It was really fun to see giant Minecraft images standing amidst classic architecture and sacred objects.

Photo 41: Now that the entire exhibit was set up and ready to go, there was finally a moment to breathe. Vu and Lydia where invited to check out one of the museum's modern interactive installations: spindle chairs designed to never fall over, no matter how far you lean back. Basically, they give you that weird sensation of falling when you tilt a chair back to far, but you don't actually fall. It was very weird, but we had a good laugh. After 20 days of sleepless nights and non-stop movement to get here, it was a perfect moment before presenting our work to the world.
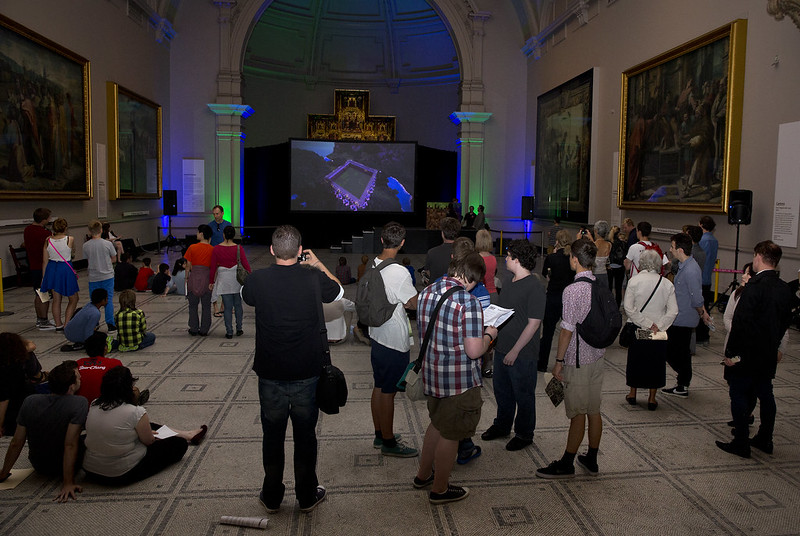
Photo 42: The World of Minecraft event opened at 6:30pm, and 5,000 people poured into the museum. Just as Lydia had hoped, the fans were thrilled to see all the Minecraft exhibits, but then also found themselves marveling over the artifacts and masterworks on permanent display throughout the museum. (photo provided by V&A Museum)

Photo 43: Everyone in attendance received a program and a "trail" that lead them to all of the Minecraft artifacts. The stained glass window got a lot of attention.

Photo 44: Here, Lydia models the Minecraft jewelry. A silver Creeper broach, and a chicken cameo.

Photo 45: Also included in the painting room, this is a piece entitled "Cubic Cherubs", inspired by Raphael's Sistine Madonna.

Photo 46: The third painting was inspired by Grant Wood's Modernist work, American Gothic. For my version, I decided to recreate the background verbatim, and turn the elderly couple into Steve and the Creeper.

Photo 47: The videos to come will show more of the exhibits in the museum environment, but I wanted to include a few of my favorite photos from the night. Here, the katana sits among ACTUAL katanas and Samurai armor donated to the museum by Japan.

Photo 48: This image shows the Nethernomicon on display at the front of the V&A library, which is home to such rarities as the original Charles Dickens manuscripts! I imagine there would be a hefty fine for not returning those by the due date!

Photo 49: Last but not least, here is the Steve and Wolf statue in the V&A's great statue hall. It was a dream come true to be able to show my art among such a revered collection. And I am so glad to be part of the Minecraft exhibit. Minecraft fans are so creative, and being able to share my passion for creating with them is truly inspiring. I hope the work I did for "World of Minecraft" has inspired some of them!
Many thanks to Mojang, Notch, Lydia, Carl, Vu, Junkboy, Jeb, and all the entire Minecraft team for making me part of their world. And very special thanks to Ruth, Joana, Kieran, and the staff at the V&A museum for their support in this amazing opportunity.
Let me know if you have a favorite piece in the comments below. And say hi on twitter (@gregaronowitz) or, if you were at the exhibit, share a picture with me on instagram! And don't forget to keep an eye out for behind the scenes videos on my youtube channel!
Ok, I've got to get back to work. Minecon is coming...
The way you turned interpreted these items and paintings into reality is jaw dropping. I wish I could have made it to the exhibit to see your work. Just amazing.
ReplyDeleteGreetings from Los angeles! I'm bored to tears at work so I decided to check out your website on my iphone durig lunch break.
ReplyDeleteI love the khowledge you present here and can't wait to take
a look when I get home. I'm amazed at how quick your blog loaded on my
phone .. I'm not even using WIFI, just 3G
.. Anyways, wonderful blog!
My webpage; pinterest home decoration ()
Amazing. This blog looks wonderful. Amazing photos, amazing content. Greetings from Tatvachintan Really super blog.
ReplyDeleteHow would a guy get his hands on Enderman Scream an/or Cubic Cherubs?
ReplyDeleteI found you looking for minecraft sculptures/art to make for my son. We've done a blue stone ore wall light, some mosaic tiles, and basic things for him, but I want something that challenges the norm. Well, your work is far past challenging the norm... I am amazed at your range. You truly are an artist. Thank you for sharing it with us.
ReplyDelete